
Turnitin Sign Up Guide for Students and General Users

Many students and general users encounter Turnitin when submitting papers or checking originality but may feel unsure about how to start.
Questions often arise about account creation, required information, and navigating the platform.
This article clarifies the Turnitin sign up process, provides practical tips, and addresses common obstacles.
Reading on will help you create your account confidently and avoid delays when using Turnitin.

Understanding Turnitin Accounts
Types of Turnitin Accounts (Student vs. General User)
Turnitin accounts are designed to accommodate both students and general users.
Student accounts are typically linked to a class ID and enrollment key provided by an instructor or institution, allowing access to assignments and similarity reports.
General user accounts can be created independently, often for educators, researchers, or individuals submitting documents outside a formal class structure.
Understanding which account type fits your situation is essential before beginning the Turnitin sign up process.
Benefits of Creating a Turnitin Account
Having a Turnitin account provides access to originality checking, submission tracking, and personalized feedback on written work.
Students can submit assignments securely, monitor similarity scores, and receive instructor comments.

General users benefit from the ability to check documents for originality, maintain a record of submissions, and manage multiple projects in one account.
A verified account also ensures secure access to all Turnitin features without delays or technical issues.
Requirements Before Signing Up
Before starting Turnitin sign up, ensure you have a valid email address, a reliable internet connection, and any institution-provided details like a class ID or enrollment key if applicable.
Choose a secure password that meets Turnitin’s criteria and decide whether you need a student or general user account.
Checking browser compatibility and clearing cache can also prevent sign up errors. Being prepared with these requirements reduces the likelihood of verification or login problems during the registration process.
These foundational points set the stage for moving directly into the step-by-step Turnitin sign up process, detailing how to access the registration page, complete your information, and activate your account efficiently.
Step-by-Step Turnitin Sign Up Process
Accessing the Registration Page
Once you understand the type of Turnitin account you need, the first step is to access the official registration page.
Students usually receive a class ID and enrollment key from their instructor, which will direct them to the correct portal.
General users can navigate to Turnitin’s main website and select “Create Account” to start the sign up process.

Make sure you are using a supported browser and a stable internet connection to prevent loading issues.
Filling Out Personal and Institutional Details
After reaching the registration page, enter your full name, valid email address, and any institution-specific information required, such as class ID or school name.

Accurate entry is crucial to ensure your submissions are correctly attributed and linked to your class or institution.
Double-check for typos, especially in your email address, as this will be used for verification and future account recovery.
Setting Secure Passwords and Account Recovery Options

Choose a strong, unique password that meets Turnitin’s security criteria, typically including a mix of letters, numbers, and symbols.
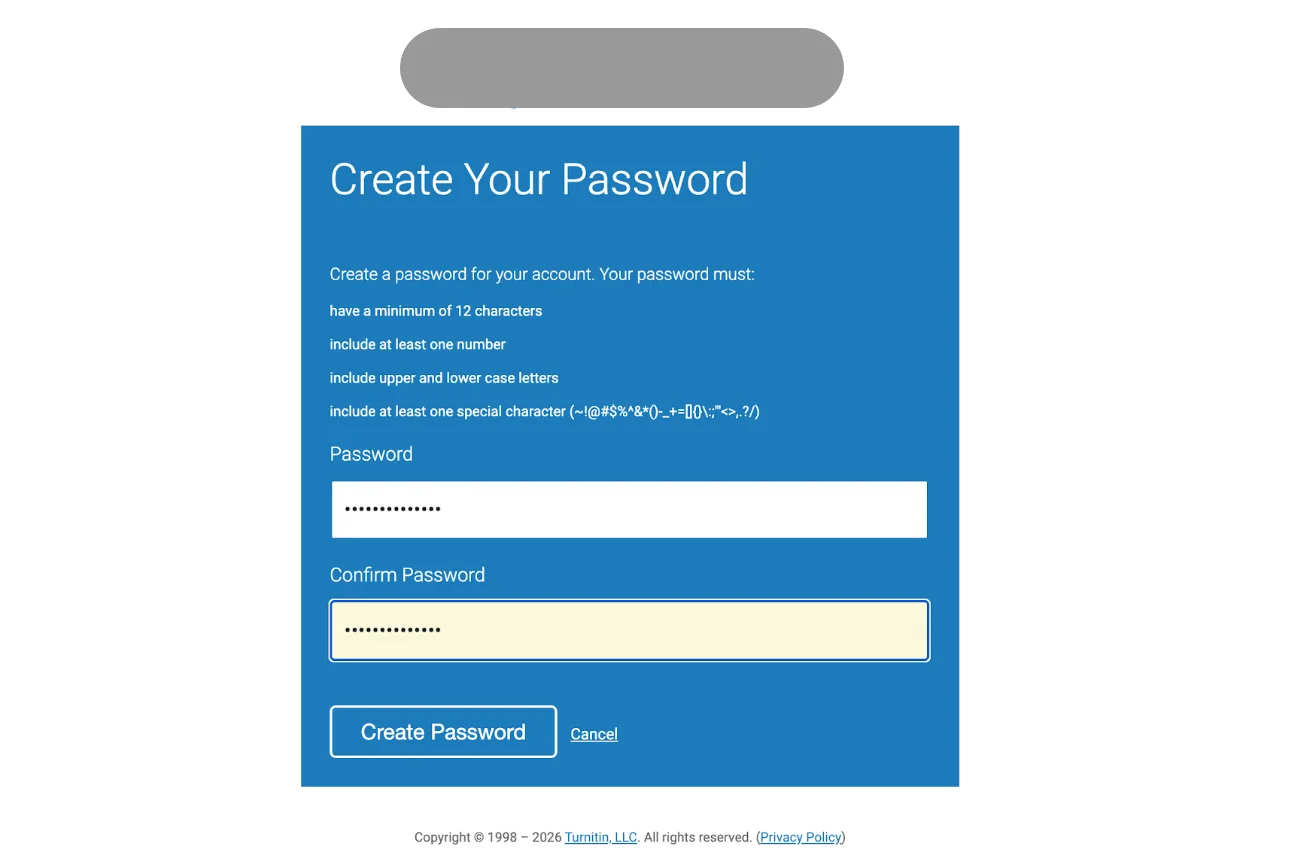
Record your password securely to avoid future login issues. Set up account recovery options, such as a secondary email, which allows you to reset your password if needed without losing access to your submissions.
Common Errors to Avoid
Avoid using an already registered email address, leaving mandatory fields blank, or entering incorrect class IDs during Turnitin sign up.
Inconsistent or incomplete information can block account activation or cause submission errors later.
Using unsupported browsers or ignoring verification emails are also common issues that prevent successful registration.
Following these steps ensures a smooth Turnitin sign up experience and prepares you for the next stage: verifying and activating your Turnitin account.
Verifying and Activating Your Turnitin Account
Email Verification Procedures
After completing Turnitin sign up, you will receive a verification email at the address you provided. Open the email and click the verification link to confirm your account.

This step ensures that your email is valid and that Turnitin can communicate important notifications about submissions and originality reports.
Check your spam or junk folder if the email does not appear within a few minutes.
Troubleshooting Activation Issues
If the verification link does not work or expires, request a new activation email from Turnitin’s login page.
Ensure your browser is updated and clear your cache if the page fails to load. Incorrectly entered email addresses or previously registered accounts can also prevent activation, so double-check your information.
Contact Turnitin support if problems persist to avoid delays in accessing your account and submitting assignments.
Completing the verification and activation process confirms your Turnitin account is ready, allowing you to proceed to managing your profile and adjusting account settings efficiently.

Managing Your Turnitin Profile and Settings
Updating Personal Information
Once your Turnitin account is active, you can update personal information such as your name, email address, or profile picture.
Keeping this information current ensures that submissions are properly attributed and that you receive all notifications from instructors or the platform.
Log in to your account, navigate to your profile settings, and make any necessary changes carefully to avoid submission errors.
Notification and Privacy Settings
Turnitin allows you to customize how and when you receive notifications about submissions, originality reports, and instructor feedback.
You can also adjust privacy settings to control who can view your account information and activity.
Review these options early to match your preferences, ensuring you stay informed without unnecessary emails while maintaining the security of your account.

Linking Classes or Institutions
For students, linking your account to classes using the provided class ID and enrollment key ensures your submissions are correctly assigned.
General users may link to institutions or groups for organizational purposes or collaboration. Proper linking is critical for accurate tracking, reporting, and access to relevant assignments and resources.
Managing these settings thoroughly prepares your Turnitin account for smooth use and sets the stage for learning practical tips to make Turnitin sign up even easier.

Tips for Smooth Turnitin Sign Up
Recommended Browsers and Devices
For a seamless Turnitin sign up experience, use the latest versions of browsers like Chrome, Firefox, Safari, or Edge.
Desktop or laptop devices are preferred over mobile phones for full access to all registration and verification features.
Ensuring your device’s operating system is updated can prevent compatibility issues and reduce errors during account creation.
Avoiding Duplicate Accounts
Check whether you already have a Turnitin account linked to your email before creating a new one.
Creating multiple accounts can cause submission errors, mismatched originality reports, and access issues.
If you suspect a previous account exists, attempt to log in or use the “Forgot Password” feature instead of starting a new registration.
Handling Login Problems Efficiently
If you encounter login issues during or after Turnitin sign up, clear your browser cache, verify your email and password, and ensure the account is fully activated.
Use Turnitin’s support resources or contact customer service if the problem persists.
Addressing login problems promptly prevents delays in submissions and ensures uninterrupted access to your account.
Implementing these tips lays the groundwork for resolving common concerns, which will be further addressed in the upcoming Frequently Asked Questions section.
FAQ

1. How Can I Complete Turnitin Sign Up Without a Class ID?
You can complete Turnitin sign up without a class ID by selecting a general user account during registration. This allows you to access Turnitin features independently of a specific class.
2. Can General Users Sign Up for Turnitin?
Yes, general users can create a Turnitin account without instructor-provided class information. This is ideal for researchers, writers, or anyone submitting documents outside a formal course.
3. Can a Regular Person Use Turnitin?
Yes, individuals not enrolled in a class can sign up as general users to check documents for originality and manage submissions.
4. How Do I Get a Free Turnitin Account?
Turnitin accounts are usually provided through schools or institutions. For independent users, a free Turnitin account option may be limited; check Turnitin’s website for any trial or general user registration options.
5. How Do I Register on Turnitin?
To register, go to the Turnitin sign up page, choose your account type, fill in your personal and institutional details, set a secure password, and complete email verification.
Conclusion
The Turnitin sign up process is straightforward once you understand the steps, account types, and verification requirements. Once your account is ready, you can learn how to use Turnitin effectively for submissions and originality checks.
This guide highlighted essential tips, common pitfalls, and profile management strategies for both students and general users.
Following these instructions ensures your Turnitin account is active, secure, and ready for submissions. Properly completing Turnitin sign up helps you access all platform features confidently and avoid delays.